
Pedestal Sink Installation: Where the Plumbing Has to Land
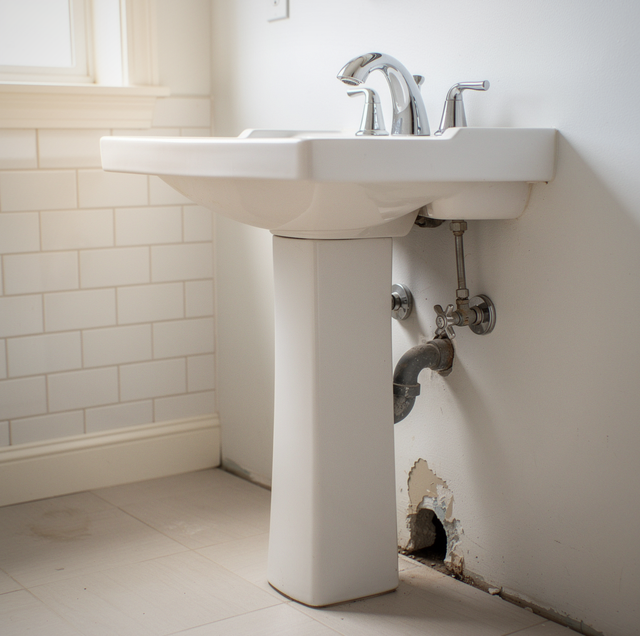
A vanity forgives a lot. Close the doors and the trap, the shutoff valves, the supply risers, and any extra slack coiled in the drain line all disappear behind two panels of cabinetry. Nobody but a plumber ever has to look at any of it.
A pedestal sink forgives none of that. There is no cabinet, so every fitting a vanity would have swallowed now sits in the open air, at a height and position that have to be right, because there is nothing to hide a P-trap that landed a couple of inches off-center or a supply riser poking out past the edge of the basin. The column in front covers a narrow strip of wall directly behind it and nothing more. Any plumbing that does not fall within that strip is on display for as long as the sink is installed.
That is the real difference between hanging a pedestal sink and swapping a vanity: the plumbing is no longer covered up; it is being built to a much smaller, much more visible target.
What the Pedestal Column Hides and What It Does Not
The column is not a substitute for the wall connection. On most designs, the basin's weight is carried by a wall bracket or a pair of hanger bolts, with the column screening the plumbing and, on many models, sharing part of the load once it has been shimmed to bear evenly. The wall connection is sized as if the column were not there. What the column actually conceals is narrow: the P-trap and the short vertical drop of the trap arm coming out of the wall, and that is about the limit of it.
Everything else (the supply risers, the angle stops, the escutcheons where they pass through the wall) sits beside the column, not behind it, unless the basin happens to be wide enough to overhang them. A narrower pedestal basin covers less horizontal ground than a vanity's backsplash did, so hardware that used to sit safely under a countertop lip can end up exposed on either side of a slim column. Before any fixture goes in, it is worth confirming how much width the specific basin actually shields, because that figure varies by model and changes what counts as "hidden" versus "visible" for that installation.
Measure from the center of the drain outward to each edge of the basin, not the basin's overall width. That half-width determines whether an angle stop lands behind the basin or beside it.
Drain Height and Centering Behind the Basin
Every pedestal basin is built around a fixed drain-outlet location that the manufacturer sets when they design the bowl, and that figure varies slightly from one model to the next. It is not a single universal number; it is whatever height and horizontal position allow the drain to line up with the bowl's outlet once the basin is mounted at its intended height on the wall. A plumber works backward from the specific basin, not from a generic target, to know where the sanitary tee inside the wall needs to sit.
Centering matters just as much as height. The drain has to land directly behind the midpoint of the column, because that is the only place the trap and trap arm are guaranteed to stay concealed. A tee that is off-center by even an inch or two can push the trap out from behind the column on one side, which is exactly the kind of exposed fitting a pedestal installation is supposed to avoid. Where an old drain stub already exists from a prior fixture, its position gets checked against the new basin's outlet before assuming it will simply line up.
Supply Stub-Out Placement and Stop Clearance
Hot and cold stub-outs face the same visibility problem as the drain, just doubled. Both risers need to sit within the narrow window the column and basin create, at a height that clears the underside of the bowl and is close enough together that the angle stops do not crowd the column's edge.
Clearance around each stop is its own consideration. An angle stop needs enough open space around it for a wrench or a hand to turn the handle and for a riser to thread on and off without hitting the basin, the column, or the wall. On a vanity, that clearance lives inside a cabinet where nobody minds if it is tight. On a pedestal, tight clearance means an installer working blind against a wall that is also on display, and it often means the stops sit slightly lower or closer together than they would on an open wall specifically so the escutcheons stay behind the column rather than beside it.
Wall Backing and How the Basin Carries Its Load
This is the part a cabinet always hid and a pedestal never can. A pedestal basin hangs from a wall bracket or a pair of hanger bolts sized to carry the full weight of the porcelain, the water inside it, and anything ever leaned on the front edge, whatever share the column takes once it is shimmed. That bracket has to anchor into something solid, which means solid blocking between the studs at the exact height the basin's mounting bolts will hit, carpentry that belongs to whoever is opening and closing the wall, not to the plumbing side. Drywall alone, even with heavy-duty anchors, was never built to carry that load indefinitely.
A pedestal basin that is not lagged into solid blocking can pull loose from the wall under normal use, from leaning on the rim to a child stepping on it. A loose basin can shatter and flood the floor.
Where the wall behind an old vanity never needed that blocking, because the countertop and cabinet frame carried the load instead, it has to be put in before the basin can hang, and it has to be sequenced with whoever is opening the wall rather than assumed to be already there. It is one more reason a pedestal is not a drop-in swap for whatever used to be there on the wall.
Converting from a Vanity to a Pedestal
Pulling out a vanity exposes plumbing that was built to disappear behind cabinet doors, not to sit inside a pedestal's narrow footprint. The existing trap, tee, and stub-outs are often positioned to suit whatever the old cabinet's layout required: off to one side, lower than a pedestal needs, or spaced for a widespread faucet the old counter accommodated. None of that is guaranteed to fall where a pedestal column will actually cover it.
That mismatch is the real work in a conversion. The trap arm and supply lines frequently need to be extended, rerouted a short distance inside the wall, or rebuilt at a new height so they land behind the column rather than beside it. The wall itself needs the blocking described above, since a vanity's frame never had to carry that job. And the section of wall the old cabinet covered, which was never finished because nobody was ever meant to see it, becomes visible the moment the vanity comes out. It has to be patched and refinished before the new basin goes up rather than after, and that finish work belongs to whoever is running the room.
The Exposed Trap and Supply Finish
Once the trap, risers, and stops are visible in the open rather than behind cabinet doors, their finish stops being incidental and becomes part of how the bathroom looks. A chrome-plated brass P-trap and trap arm reads very differently under a pedestal than a builder-grade PVC trap that was never meant to be seen. The same goes for the escutcheons that cover each wall penetration and the angle stops and supply risers themselves, which are commonly upgraded to a matching chrome or brushed finish rather than left as whatever was behind the old vanity.
Matching that hardware to the faucet finish is worth deciding before installation, not after, since swapping a trap or a set of risers a second time means breaking a connection that is already sealed and tested. A mismatched finish will not cause a leak, but on a fixture with nothing to hide, it is the kind of detail that stands out far more than it would behind a cabinet door.
Frequently Asked Questions
Some columns include small adjustable feet, and others take thin shims where the base meets the floor, because a slab or an older subfloor is rarely flat enough for the column to bear evenly on its own. Use a rigid shim rather than anything compressible, and set it after the wall bolts are seated, so the column is packed up to meet the basin, rather than jacking the bowl off its bracket.
For the moment, the basin is lifted into place against its wall bracket, yes: one person supports and aligns the bowl while the other drives the mounting bolts, because the basin is not stable on the bracket until the mounting bolts are seated, whatever the column is doing underneath it. Attempting it solo risks the basin shifting off the bracket mid-installation, which is a common cause of a chipped or cracked bowl before the sink has even been used.
Faucet holes come in a few standard spacings (a single center hole versus a widespread pattern set several inches apart), and a pedestal basin is manufactured for one specific spacing. If the existing faucet doesn't match the new basin's hole pattern, the fix is usually a different faucet sized to the basin, not moving the supply risers, since the risers only need to reach the valve body wherever it sits.
It happens more often in older houses than people expect: water was controlled from a main shutoff or a valve under the floor, with no angle stops anywhere near the fixture. That is not something a pedestal sink itself causes, but stops get added as part of the installation regardless, since a pedestal basin with exposed risers needs its own accessible shutoffs rather than relying on a valve elsewhere in the house.
Not always. Some pedestal basins are cast without an overflow opening at all, which changes the drain assembly slightly since there is no overflow path to tie into the trap setup. It is worth checking the specific basin's design before assuming the drain hardware from a prior sink will transfer over, since a basin without an overflow uses a simpler pop-up or strainer assembly than one that has one.
It can, but that is a bigger job than landing the plumbing on points that already exist behind the current wall. Relocating a drain and supply lines to a new wall means opening that wall and running new lines to the chosen spot, rather than working within an existing rough-in, closer to installing a fixture where none was before than to the kind of conversion described above.
Confirm the rough-in before the basin is ordered — a licensed plumber can pin down where every connection behind that column has to land. Ser Plumbing serves Paramount, Bellflower, and Lakewood. Call (310) 953-3566.
