
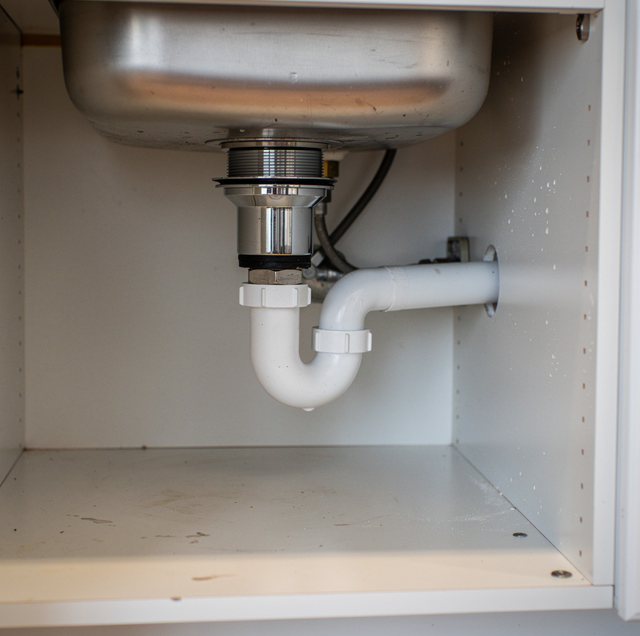
Under a sink that has never had a garbage disposal, there is a plain strainer basket sitting in the drain opening, held from below by a locknut, a gasket, and a tailpiece and nothing else. That basket is what a disposal takes the place of, and the drain opening it sits in is the same hole a disposal's mounting flange uses. There is no dead unit to pull out and no wiring already run to a switch. What decides whether the swap works is what sits directly around that opening.
Before a plumber pulls the old strainer, four things get checked, in order, because each one can rule the job in or out before the sink is ever touched:
- Whether the drain opening and the existing strainer assembly will actually come out clean.
- Whether the drain arm running to the trap sits low enough for a disposal's added height.
- Whether the cabinet has the depth and clear floor space a disposal body needs.
- Whether a dishwasher already drains into the sink and has to be re-routed into the new unit.
A no on any of the first three usually still means the job happens, with some extra work built in. A no on the fourth just means one more hose gets moved. This is about adding a disposal where there hasn't been one under your sink, not fixing or swapping one that's already there.
The Drain Opening and Whether the Strainer Comes Out
A kitchen sink's drain hole is the same hole a disposal's mounting flange sits in. Nothing about the opening itself typically needs to change. What decides the difficulty is what's holding your current strainer in place. Underneath the sink, a locknut threads up against the sink bottom, a rubber gasket seals against the underside of the flange, and a slip-nut holds the tailpiece onto the strainer body. On a newer sink, that stack backs off with a wrench in a few turns. On an older one, especially where hard water has left mineral scale on the threads, the locknut can seize enough that it has to be cut off rather than turned off.
Either way, the strainer comes out. What a plumber is really checking at this step is the flange itself: whether it sits flush enough with the sink bottom for a disposal's gasket and mounting ring to seat evenly, or whether years of corrosion have pitted the metal enough to leave a gap that no amount of tightening can close. That second case is rare, but it's the one scenario where the sink itself, not the drain hookup, becomes the limiting factor.
The Drain Arm's Height and Slope Decide the Rest
A strainer basket takes up almost no vertical space between the sink bottom and the trap below it. A disposal body does. It adds a body's worth of housing that the drain line now has to clear before water can keep dropping toward the trap. That's the real question at this stage: does the horizontal drain arm running from the trap toward the wall or floor stub-out sit low enough that, once a disposal is bolted in above it, the water leaving the unit still has somewhere to fall.
Where the arm already enters low, this is a non-issue: the plumbing was practically built for the eventual disposal even if nobody ever bought one. Where it sits high, flat, or close to level with the sink bottom, the fix usually isn't tearing into the wall stub-out. It's rebuilding the trap arm itself: lowering the trap, adding a short offset, or swapping a fitting so the discharge tube still pitches downward rather than running flat or, worse, slightly uphill. A drain line that doesn't fall toward the trap won't clear itself between uses, no matter how well the disposal grinds.
Cabinet Clearance Around and Below the Unit
A disposal hangs below the sink, not beside it, so the space that matters is the open volume directly under the drain opening, not the cabinet as a whole. A center support board running between the cabinet's side walls, a mounted water filter housing, or a bin track built into the cabinet floor can all sit exactly where the disposal's body needs to hang. None of that is usually a reason to stop the job. It's a reason to move whatever's in the way, or, occasionally, to choose a shorter-bodied unit that clears a shallow cabinet.
Keep the breaker for the sink circuit off for the whole job, not only while the strainer comes out. Once wiring is exposed at the cabinet, working around it with power on turns a routine job into a dangerous one.
The other clearance question is electrical, and it belongs to a different trade. A disposal needs power at the cabinet, either through an existing switched outlet or a dedicated cord run to a wall switch. If that connection already exists, an outlet in the cabinet left by a prior owner's setup, the plumbing side of the job never touches it. If it doesn't exist at all, running new wiring is an electrician's scope, not a plumber's.
What Happens to the Dishwasher Drain
A dishwasher that already drains into the kitchen sink doesn't send its water directly into the trap. It runs through a hose connected to a dedicated inlet cast into the dishwasher tailpiece just below the strainer body, which is why removing that strainer assembly matters too. Once a disposal is in place, that inlet is gone, and the dishwasher's drain hose has to connect to the knockout plug built into the side of the disposal's housing.
A new disposal's dishwasher inlet is sealed by a pre-scored knockout plug. A plumber drives it loose, then removes the freed disc from the chamber. Left sealed, the dishwasher cannot drain; left loose, the disc jams the unit.
The reason the hose can't just tie in anywhere along the new drain line comes down to backflow. Without a high loop, meaning the hose is routed up near the underside of the counter before it drops back down to the disposal, or without an air gap mounted at the sink deck, waste water sitting in the disposal's housing can siphon backward into the dishwasher when the disposal runs. Either method breaks that siphon path; which one is used usually comes down to what the cabinet already has room for, not to differences in how well they work.
Batch-Feed or Continuous-Feed Changes What Has to Exist at the Counter
The choice between the two disposal types doesn't affect the drain work already covered above. It changes what has to be true above the counter, at the point where you actually start the unit. A continuous-feed disposal is started by a control outside the unit: a wall toggle, or a countertop air switch pushed through its own hole in the counter. Where a wall toggle is already in place, nothing new needs to be cut into the counter, which is a large part of why continuous-feed is the more common stock install.
A batch-feed disposal has no external control at all, because dropping the stopper in and twisting it closes a switch inside the unit. That takes the wall toggle out of the picture, and with it any wall work, though it also means the stopper is the only way the unit ever starts. The air switch is the option that goes the other way: a push-button through its own hole in the counter, connected by a thin air tube to a control box below, and that hole is permanent on stone. Neither type grinds better than the other. The difference lies entirely in what must be built at the counter to start it.
The Install Sequence, Once Everything Checks Out
With the drain opening, arm height, clearance, and dishwasher connection all confirmed, the actual swap-in is a short, ordered job. The old strainer assembly comes out first, followed by cleaning the sink's underside flush enough for a new gasket to seat. The disposal's mounting ring goes on next, seated against a fresh seal on the sink bottom and locked in place from below. The unit itself then twists and locks onto that ring, the same mounting system used whether this is the first disposal a sink has ever had or the fifth.
From there, the discharge tube is aligned toward the trap using the slope confirmed earlier, the dishwasher hose is connected if one is being rerouted, and every joint gets a trial run with water flowing and the disposal off before it's ever run under load. Only once every connection holds dry does the unit get switched on and tested grinding water and light scraps together, checking for vibration against the cabinet or drain line as much as for leaks. Power to the unit is restored at the breaker only after the plumbing side of the job is finished.
Frequently Asked Questions
Not because it's a first install. Sizing comes down to how much and how often the unit gets used, not whether one existed before. What is specific to a first install is the cabinet: a larger motor housing hangs lower and takes up more of the room under the sink, so on a shallow cabinet, or one with a shelf or a filter already in it, the chosen size has to clear whatever the clearance check turned up. Either size mounts the same way once the drain and clearance checks are done.
Ser Plumbing installs InSinkErator's Badger series as the standard stock unit, and also installs Moen disposals on request. InSinkErator and Moen use compatible three-bolt twist-and-lock mounts, so the choice comes down to preference and availability rather than anything about how the install itself goes.
The disposal's discharge port isn't fixed in one position. It can be loosened and rotated around the body before the final connections are tightened, allowing the discharge tube to point toward where the existing trap sits rather than forcing the trap to move. That flexibility is often what saves a job that looked like it needed the drain line rebuilt.
Yes. The splash guard is the rubber baffle that sits just inside the opening and breaks up the initial splash when water and scraps go in. It's a separate, replaceable part from the disposal body itself, so a torn or stiff splash guard down the line gets swapped on its own instead of replacing the whole unit.
A like-for-like swap typically runs about an hour. A first-time install runs longer, and the variable that moves it most is not the disposal but the strainer's locknut. Where that nut backs off cleanly, the added time is modest. Where it has to be cut off, the extra work happens before the new unit is ever unboxed, which is why a plumber wants a look under the sink first.
Yes, and it's a common add-on when a kitchen is already being opened up for a disposal install. That line gets its own dedicated valve and routing back to the water supply, rather than piercing an existing pipe with a saddle valve, which is a shortcut that fails often enough that Ser Plumbing doesn't use it.
Find out if your cabinet can handle a first-time disposal installation — the drain, clearance, and dishwasher hookup are checked in one visit. Ser Plumbing installs sewer cleanouts across the area, from sewer cleanout installation in Norwalk to Compton. Call (310) 953-3566.
