
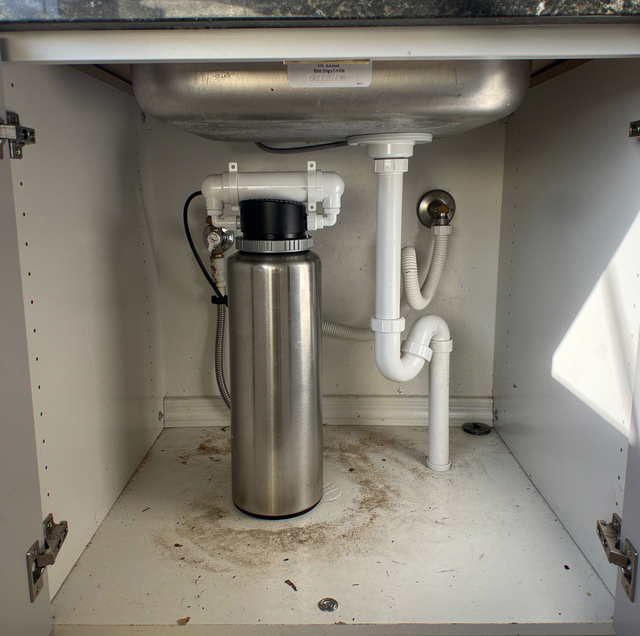
Open the cabinet under the kitchen sink and look at the floor. A P-trap and a tailpiece take the middle. Two angle stops sit against the back wall with supply risers running up from them. In many kitchens, a disposal takes up one whole side. What is left is a strip of cabinet floor, and a reverse osmosis system arrives expecting a storage tank to stand somewhere on it.
The sink deck above has its own version of that question, and it only runs one direction. A small filtered-water faucet will sit in an old full-size faucet hole, because its escutcheon is wide enough to cover the opening. A full-size faucet will never sit in a hole cut for a filter tap. That one-way door decides more about the work than the brand on the carton does.
Neither space is described anywhere on that carton. Six physical conditions make the decision instead, and each can be checked before anything is ordered.
One boundary before the list. A whole-house system treats water at the point of entry, so every tap and every appliance uses the same water. An under-sink system treats only what leaves one dedicated tap in the kitchen. If the goal is to drink and cook water at a single location, the work stays within that cabinet.
Finding a Hole for the Dedicated Faucet
An under-sink filter or reverse osmosis system almost always gets its own small tap rather than feeding the main kitchen faucet. There is a mechanical reason for that. RO product water arrives slowly, at tank pressure rather than supply pressure, and it has no business passing through a mixing valve and a hot side. A dedicated faucet gives filtered water a short, cold-only path of its own from the last cartridge to the spout.
That faucet needs a hole, and where that hole goes is the first fork in the job.
An existing unused hole: Plenty of kitchen sinks were punched with three or four holes, and the outer one often sits capped under a chrome button because nothing was ever mounted there. If one is actually free, the faucet drops straight in, and the visit stays short.
A hole freed up by something else: A side sprayer that no longer works, or an accessory removed years ago, leaves a usable opening in the deck.
A new hole: When every position is taken, a hole must be cut either through the sink deck or through the countertop behind the sink. This is where the job changes character, and the material decides how much.
Standard sink deck holes are punched at roughly 1-3/8 inches, the size a full faucet shank expects. Most filtered-water faucets use a much narrower shank and ship with a base escutcheon wide enough to cover a full-size opening. That asymmetry is the argument for cutting small: an escutcheon covers whatever is left over, and a future full-size faucet still has somewhere to go.
There is also the option of no second hole at all. An inline carbon filter can be plumbed into the cold feed of the existing faucet, so filtered water comes out of the spout already there. The trade is that filtered and unfiltered water share one path and one aerator, and reverse osmosis is not a candidate for that arrangement, because RO needs a tank and a drain that a single feed line cannot supply.
Countertop and Sink Deck Material
If a new hole is needed, the material it passes through is what the customer actually has to decide on, and there are only two options.
The first is where the hole goes: through the sink deck, or through the countertop behind the sink. Stainless takes a clean opening and gives the escutcheon gasket a flat surface to seat against afterward, so a stainless deck is usually the easy answer. Enameled cast iron and fireclay are the opposite case. The enamel is glass; it chips at the edge of a cut, and it does not grow back. On those sinks, the hole generally belongs in the counter instead, and the sink is left untouched.
The second is whether the material makes this a step in the visit or a job to hand over before anything is started. Stone, quartz, and granite composites all have to be cut wet, with the dust contained inside the kitchen, and with a careful look at what lies beneath the chosen spot: behind an undermount sink, there is often less solid material than the surface suggests, because the sink cutout is right there underneath. Laminate is the quiet one. It cuts easily and chips just as easily, and the particleboard exposed at the cut edge has to be sealed, or the cabinet below develops a slow moisture problem that nobody later connects to a faucet.
Never drill stone or an enameled sink dry, and never cut close to an undermount sink's cutout edge. Heat and edge stress crack slabs, and a cracked countertop is not damage any plumbing fitting can hide.
Cutting a sink deck or countertop where a fixture demands it is plumbing scope. Fabricating or refinishing a countertop is a different trade.
Under-Sink Space and Cartridge Clearance
The cabinet is where most surprises live. Look first at what is already claimed in there: the P-trap, the tailpiece, both angle stops with their supply risers, and in many kitchens a disposal occupying an entire half of the floor.
A filtration system adds two things to that space. The filter housings, which usually hang from a bracket screwed to the cabinet side wall or back panel, and, on an RO system, the storage tank, which stands on the floor. Manufacturers differ on whether a tank may lie on its side; treat that as a claim to verify against the specific tank rather than a general rule.
The measurement people miss is not width. It is the vertical space directly below the housings. A standard sump cartridge is changed by unscrewing the entire housing and pulling it straight down, so the system needs that much empty air beneath it or the sump will not clear the bracket. Quick-connect cartridges twist off sideways instead, trading that vertical requirement for side clearance.
A full cabinet is not a dead end. A tank can sometimes live in an adjacent cabinet with tubing run through a drilled pass-through, which adds tube length and a small pressure penalty at the faucet.
Before ordering, measure three things in the cabinet: floor-to-shelf height for the tank, the free run of side wall for the housing bracket, and the drop below the housings. A standard ten-inch sump needs its own height again to clear.
The Cold-Supply Tie-In
Every one of these systems needs cold water, which comes from the cold angle stop under the sink.
The correct method is a feed adapter: a tee that installs between the angle stop and the faucet supply riser, giving the system its own take-off with its own small shutoff. It threads onto the stop outlet on one side, accepts the faucet riser on the other, and offers a quarter-inch quick-connect port for the system tubing. Nothing gets pierced, nothing is improvised, and the filter can be isolated later without shutting the faucet down.
The wrong method is a piercing saddle valve, and it is not a fitting worth accepting on a supply line. A saddle clamps a two-piece body around the pipe and drives a small needle through the pipe wall, with a rubber gasket squeezed by the clamp as the only seal. Two things go wrong over time. The needle orifice is tiny, so mineral scale closes it up, and the filtered tap slows to a trickle for reasons that have nothing to do with the cartridges. And the supply pipe now has a hole in it whose only defense is a gasket that relaxes with age and temperature cycling. Hard water accelerates the first failure and gives the second more years to happen.
Two related checks belong in the same visit. If the angle stop is old, seized, or weeping at the packing nut, it gets replaced before anything else is attached to it, because a stop that will not close cleanly becomes a problem again the day a cartridge needs changing. And the feed comes only from the cold side: the membrane and carbon media in these systems are not designed for hot water.
The Drain Connection an RO System Needs
This is the single largest difference in scope between the two kinds of system.
A filtered-only setup, meaning a sediment prefilter and one or more carbon stages, has no drain line at all. Water goes in; water comes out of the tap; nothing is discharged. Reverse osmosis is different by design. The membrane splits incoming water into product water, which goes to the tank, and concentrate, which carries away what the membrane rejected. That concentrate has to run to the drain the entire time the system is producing.
So the sink drain has to accept a small tube. The standard fitting is a drain saddle: a two-piece clamp that closes around the vertical tailpiece over a drilled hole aligned with its port, with a gasket between clamp and pipe. That is not the piercing valve refused on the supply side: the supply saddle taps a line held under constant house pressure through a needle orifice, while the drain saddle sits on an unpressurized gravity line over a hole drilled to size.
Placement rules that matter:
- Above the trap, always; below it, discharge can pull at the trap seal.
- On the vertical tailpiece: rather than a horizontal arm, so nothing pools in the tube.
- Away from the disposal discharge side: where food slurry would eventually find the port.
An air-gap RO faucet changes the tubing count at the deck. Instead of two tubes at the shank, there are three: product water up, concentrate up, and concentrate back down after crossing an open break inside the faucet body. That break is why an air-gap faucet is audible while the system produces, and why it wants a wider deck hole and more clearance below the deck. A non-air-gap faucet keeps the shank simple and sends concentrate straight to the drain saddle. Which style applies is not purely a matter of preference, so it is worth settling before picking a faucet on looks.
Filtered Only or Reverse Osmosis at the Same Tap
The last variable is what you want the tap to do, since it drags every other item on this list along.
Filtered only: A sediment prefilter and one or two carbon stages, aimed at taste, odor, chlorine, and particulate. No tank, no drain, and flow at the tap stays close to the flow of the supply feeding it. In cabinet terms, it is the small install.
Reverse osmosis: A semipermeable membrane after the prefilters, and a storage tank after the membrane. It reduces a far wider range of dissolved material, which is the point, and what it asks in return is physical: slow production, a drain connection, floor space for the tank, and a tap flow that is only ever as strong as the tank can push.
Incoming pressure: A membrane works by forcing water against its surface, so the pressure available at the cold stop directly affects how fast the system produces and how full the tank gets between draws. A house whose pressure regulator has drifted low, or a supply line partly restricted by scale, will make a perfectly healthy RO system look like a failure. Pressure gets checked early, not last.
Post-filters: These sit between the tank and the faucet and are worth knowing about. A final carbon polish is common. A remineralizing cartridge that adds mineral content back after the membrane is offered by many makers, generally on taste grounds rather than as a settled health benefit.
Hard water ties much of this together. Scale-forming minerals do not care which cartridge you chose; they shorten membrane life and close up small orifices, which is why the condition of the incoming supply belongs in the same conversation as the faucet. Untreated hardness reaching the system means the prefilter and the membrane both work against a heavier mineral load from the first day they are installed.
Frequently Asked Questions
Usually yes, and it is one of the easier positions to reuse. One detail has to be handled first: the sprayer hose connected to a diverter port on the underside of the main faucet body. Once the sprayer is gone, that port has to be capped with the faucet maker's plug. Left open, it weeps under the sink every time the main faucet runs.
That is the storage tank. An RO tank holds water against a bladder, with air pre-charged behind it; that air pushes water up to the faucet. If tap flow weakens over months, the pre-charge is the thing to check: drain the tank completely first, then read the pressure at the Schrader valve on the tank shoulder. Bringing it back to the tank's rated pre-charge usually restores the push.
It can be teed off the product line, but pressure is the limiting factor. The tank pushes gently to begin with, and a long run across a kitchen can leave too little at the far end to fill an ice mold at a normal rate. Installers handle that either by adding a permeate pump to raise delivery pressure or by keeping the refrigerator on its own dedicated line.
Check the faucet shank length before anything else. The threaded shank has to pass through the counter, plus the sink deck if it mounts there, and still leave enough thread for the mounting washer and nut. Thick stone plus a deck flange can exceed a standard shank. The fix is either a faucet sold with an extended shank or shifting the position to a thinner section of counter.
Close the small shutoff on the feed adapter, then open the filtered tap and let it run until it stops, which relieves tank pressure so the housings are not under load. Sumps come off with a housing wrench sized to that brand's body. A cartridge change is also the time to sanitize the housings, rather than just swapping media, particularly during a membrane change.
Water standing still in the tank and the carbon stages tends to go flat and can pick up a stale taste. Before drinking from it again, drain the tank fully through the faucet and let it refill at least twice. For a longer vacancy, closing the feed adapter shutoff before leaving stops the system cycling in an empty house.
Scope the cabinet and the sink deck before ordering the system — what is already under that sink determines whether the install is a short visit or deck work. Ser Plumbing hydro jets lines across the area, from hydrojetting in Long Beach to Compton. Call (310) 953-3566.
